As more and more people are starting to pay much more attention to product safety, product labeling and specification marking is also more and more valued by consumers. The laser marking machine is accepted by many manufacturers because of its features. such as no consumables, no pollution, and permanent marking effect, can't be erased away. Standard laser marking machine machine has been widely used in industries such as food, beverage, pharmaceutical, tobacco, wine making, card making, cable, building materials, daily chemical, automobile, electronics and so on. Laser marking machines mainly include CO2 laser marking machines, fiber laser marking machines and ultraviolet (UV) laser marking machines. Laser marking machines use laser beams to engrave on various surfaces Create exquisite patterns, trademarks and text and other logos.

For those who are new to the laser marking machine, it will be a little difficult to operate by yourself or even be the most basic operation. Although most manufacturers can provide training for laser marking machines, there are also some who do not provide training or are not very professional. Then let the editor of MZLASER guide everyone as belows: The full guidance will take you about 10-15 minutes, you will be able to operate the laser marking machine easily.
How to use laser marking machines?
The booting steps are as follows:
1. Check the power cord of the marking machine to make sure it is connected correctly and reliably and the ground wire must be connected, this is very important, but usually ignored by many users;2. Pull up the air switch ( Top right )
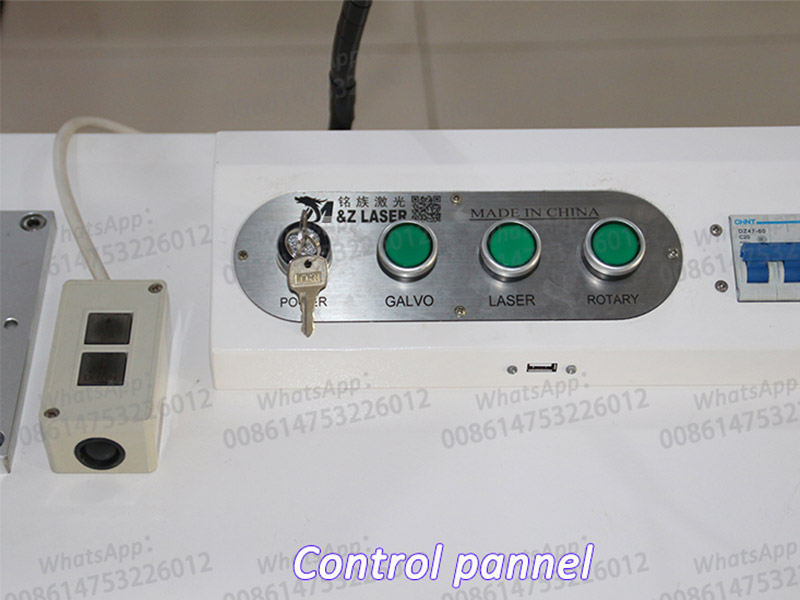
3. Turn the key switch 90 degrees to the right to make sure all power supply ready to start;
4. Press the Galvo swtich, it will indicate green light;
5. Press Laser switch, to power on laser source, the light also turn green;
6. Double click Ezcad icon to open the laser software, and remember to remove the lens cap. Till now the machine is well prepared to start working.
Laser Marking Operation
Following the below steps to go on operation
- Double-click the marking program icon Ezcad to enter the program;
- Select the marking file, double-click the date and time in the content to modify it, and click OK to complete the modification
- Click Red light to preview the engraving area, then adjust it to the area where you need to laser mark
- Place a test piece on the top of workpiece ;
- Choose the continuous mode, and then click laser mark, the laser will come to laser engrave, then adjust the height of laser head to find the laser focus
Finding Laser Focus
In order to make the marking effect best, the following steps to find the focus:
- Adjust the focal length by turning the black top wheel; If you don't know going up or down, you can move the test card up and down, to check where is laser focus then do the height adjusting.
- When you find the brightest laser spot, if you adjust higher or lower, the energy will get weak and the sound also get small, that will be the laser focus;
- After finding the laser focus, then stop the laser marking, and remove the test card, and disable the continuous mode
- Go to laser mark on your workpiece directly
The shutdown steps are as follows:
1. Close the laser software Ezcad firstly(This is very important, if didn't close the software before cutting off power supply, it may case ezcad gets back to default parameters setting)2. After confirming ezcad software is closed normally, then press "Laser" to power off its power supply
3. then press Galvo, to stop the power supply of galvo head and control card;
4. Shut down computer, and then press down the E-stop to cut off input power supply of whole set machine;
5. Close the lens cap.